
Intro
Hi, and welcome!
I've wanted to write a guide on how to make a Discord bot for quite a while, and now that Discord.js v13 is almost out, seems like a great time to do it!
v13 will introduce support for a number of new features available to developers, with a focus on making bots more intuitive, interactive and easy to use. Things like slash commands with autocomplete, and form-like features right inside discord, like dropdown menus and buttons are going to slowly become the norm going forward. There's a lot to cover, so I will split this guide into several chapters.
In this first chapter I'm going to focus on everything needed to get a bot to respond to a command, so think of it as a "Hello World" program. The following chapters of the tutorial will focus on adding support for slash commands and other interactions, handling events and commands, and hosting the bot so that it stays online permanently.
Who is this tutorial for?
I'm going to try to explain everything well, but I won't go into detail when it comes to JavaScript Syntax or how Node.js works, as there are very good tutorials on these topics.
This should be a good tutorial for you if you already have a good understanding of JavaScript & a basic understanding of Node.js. If you are completely new to these, it will be rather difficult to follow.
If you favor other languages over JavaScript, make sure to check the Developer Documentation to see what other third-party libraries are available besides Discord.js, then then try to look for a recent tutorial for those.
Before starting
To get our bot to reply to our commands, we need to follow several first time setup steps:
- Bot "Registration and invite to server"
- Have a Discord account and log in to the Discord Developer Portal.
- Create a bot application.
- Get our tokens and generate an invite link with the necessary scopes & permissions.
- Bot code (running locally for now)
- Create a new Node.js project.
- Install dependencies.
- Write some basic code to login our bot into discord and respond to messages.
For the latter half of these steps, we will of course need to have a development environment in place. So we will need a code editor, a recent version of Node.js, NPM (included with Node.js), and a shell (bash if you're on Linux; WSL or git bash should work if you're on Windows).
Ideally you should also be using version control from the start and have some linting or coding style guide. I'm going to skip how to set these up in this part of the guide though, so that we can focus on what matters most.
Finally, the code in this tutorial will follow the JavaScript Standard Style, but feel free to write yours in your preferred style.
Creating our bot application
One of the first things we need to sort out is creating a bot in the Discord Developer Portal. This will basically create our bot's account and give us some credentials we can use to log our bot into Discord.
Once you've logged in, go to the Application section and click on New Application and give your app a name.

After that, you can add an image, description and additional information on the General Information section.
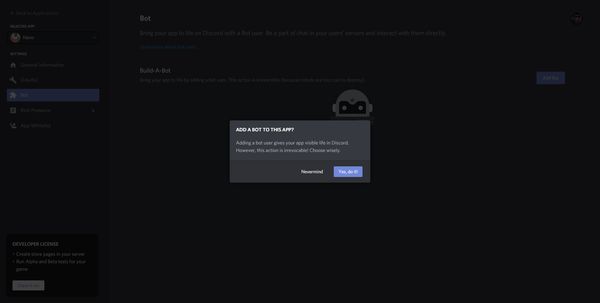
Then go to the Bot section and click on Add Bot. Now there's a bot account that can log into Discord. Feel free to review or update the bot's name and avatar if you didn't in the previous screen.

Next go to the OAuth2 section scroll down a bit and check the bot & applications.commands scopes. Scroll further down and select the permissions you think your bot will need.
These will be the permissions your bot suggests when it is added to a Discord server. When adding the bot, the server owner can uncheck any permissions they don't want to provide. They can also change the bot's permissions later from Server Settings > Roles.
Remember to be responsible with the permissions you request. Don't request any permissions your bot isn't going to need, and be extra careful with permissions related to server administration and moderation.
For your first bot or a bot intended for fun/simple commands I would suggest the following permissions only: Send Messages, Embed Links, Use External Emojis & Add Reactions.
Note that your bot doesn't need the Read Message History permission to respond to commands or messages, because new messages will be notified by the message event instead. You also won't need the Use Slash Commands permission, as that's to allow your bot to invoke slash commands, not to register them or reply to them.
Once the necessary permissions have been checked, scroll up a bit and copy the URL you'll find in the scopes section. Navigate to that URL, and you will see a Discord screen allowing you to add the bot to a server you manage.

After adding the bot to your server, you'll see it appear offline in the members list.
First steps coding our bot
Now that our bot is created on Discord, and added to our server, we need to log it into Discord. This is the part of the tutorial where we are going to start writing code.
Node.js Project
First, let's start by creating a directory for our bot, and initialize our Node.js project. From the shell, let's do this:
mkdir nano-bot
cd nano-bot
npm init -y
Now open this folder in your code editor. You'll see a package.json file has been created for you. Let's open it and add some stuff to it:
{
  "name": "nano-bot",
  "version": "1.0.0",
  "description": "Nano is a simple Discord bot coded with Discord.js",
  "main": "./src/index.js",
  "scripts": {
    "dev": "nodemon ./src/index.js",
    "start": "node ./src/index.js",
    "test": "echo \"Error: no test specified\" && exit 1"
  },
  "keywords": [],
  "author": "Yogensia",
  "license": "ISC"
}
Here I've updated the path to main (our future app's entry point), added a couple of scripts (dev & start) and filled in some optional info such as description & author.
Before continuing make sure to save the package.json file.
Next we are going to use npm to install Discord.js as a dependency.
npm i discord.jsDependencies are added to your package.json and the node_modules directory contains all the necessary code for them.
Now create a src folder and inside it, create our entry point, index.js.
mkdir src
touch src/index.js
Simplest bot app
Ok, now we are going to finally write the code for our bot (I promise this time!).
First, open the index.js file we just created and add the following code:
const { Client } = require('discord.js')

/**
 * Init client.
 */
const client = new Client({
  intents: [
    'GUILDS',
    'GUILD_MESSAGES'
  ]
})

/**
 * Ready event.
 */
client.once('ready', () => {
  console.log(`Logged in as ${client.user.tag}!`)
})

/**
 * Login to Discord.
 */
client.login('TOKEN')
Here's a look at what this code does so far:
- The first line is just loading the
Clientclass from the Discord.js dependency we installed earlier. - The
Init clientsection is creating a new instance of this class, and declaring whichintentswe are going to need for our bot to work. Specifying intents is required starting with Discrd.js v13, you can learn more about intents in the Discord Developer Portal. For now we are just going to need theGUILDS&GUILD_MESSAGESintents, so our bot can be notified when new messages are sent to the server and it can respond to them if they are commands. - The
Ready eventsection, as you can imagine, listens for the ready event (when our bot is finally logged in). - Last but not least,
client.login()logs the bot into discord.
Looks like we are ready to go, but if we save and run this code it will not work yet. That's because we still need to provide our bot's credentials in our code.
This is actually a very simple step. Go back to the Developer Portal, and navigate to your Bot Application, then to the Bot tab. Below the username you'll see a token section. You can either click on the link to reveal your token, or just on the Copy button.
Now go back to the last line of your bot's code and replace the word token with your actual token.
This token is of course like a password, so keep it private, and don't include it directly in your code if you're going to upload your source code to a public repository in GitHub or anything like that. In a future chapter of this guide we'll cover how to use environment variables to safely manage sensitive data like tokens, API keys and similar credentials.
Running the bot
There's several ways you can run your code. You can just type node src/index.js in the shell from the root of your project, but since this is a Node.js project lets try something more appropriate.
npm startThis is a shorthand for running the start script defined in your package.json file earlier. In other words, the same as doing npm run start.
After running the command give it a moment, and you should see the login message on your shell. If you take a look at Discord, you'll see the bot is now online! 🤖
But it still does nothing but sit around in your server. We need to write a few more lines of code so that it can say its first words!
Responding to a message
In order to respond to messages, first we need to be notified when they are sent. We do this by listening to the message event:
/**
 * Message event.
 */
client.on('message', message => {
  if (message.content === 'Hi') {
    message.channel.send('Hello World!')
  }
})
Whenever a message is sent to a channel visible to the bot, this event will be triggered, and we will be able to access the message itself via message.content. The message object also includes information about the channel the message was sent in, so when the user types "Hi", we can say hi back in the same channel with message.channel.send().

Closing Words
And that's it for this part of the tutorial. Our bot is now operational and will be notified when a user sends a message to our Discord server, giving it a chance to reply with some data. This will be the foundation for our bot's commands, and after a little twist, also how we will implement slash command support.
In the next chapter we will start improving the architecture of our bot to make it more extendable, which means splitting code into different files and creating actual commands.